

This guide will be useful for people who own a Wall Clock or a Mantel Clock. You can see our full selection ofWall Clocks here andMantel Clocks here.
Located in the shipping carton with the clock will be a key to wind the clock. If provided on your model, the shipping carton may also include a pendulum and finial that are separately packed. Please keep all of the original packaging material.
WARNING: KEEP PLASTIC BAGS AND SMALL PARTS AWAY FROM CHILDREN.
Access to the clock movement and chimes is made through the back of the clock. Howard Miller uses a combination of rubber bands, foam, styrofoam, metal, and cardboard to secure the movement and chimes during shipping.
Cut rubber bands with scissors and discard.DO NOT PULL ON THE RUBBER BANDS TO BREAK.
Remove foam, styrofoam, and cardboard from around the movement and chimes. When possible, pull in the direction shown to remove. (See figure 1 & 2)

For clocks with a pendulum, cut the rubber band or remove the metal spring clip from the back side of the movement by first pulling one end free. (See figure 2).
Open the front door and remove the white plastic insert holding the minute hand at the 3:00 location (this insert is not used on all models).
Follow the remaining instructions as they apply to your clock.
Follow these instructions for hanging the pendulum.
NOTE: To perform the following steps, Howard Miller suggests wearing cotton gloves or using a soft cloth when handling parts.
Some pendulums have a colored protective plastic film covering the pendulum disk. Carefully remove this film before hanging the pendulum.
To hang the pendulum, locate the pendulum guide through the front door or back access panel. While holding the pendulum guide with one hand, slip the pendulum through the front door with your other hand. Place the pendulum hook over the pin or through the slot on the end of the pendulum guide, and lower the pendulum until it is hanging securely on the pendulum guide. (See figure 2).
Follow these instructions for hanging weights.
Do not remove the styrofoam blocks until after your clock has been operating for at least eight (8) hours. Check the weights to ensure that they are tightly assembled. Check to make sure that the cable is in the cable pulley. Hang the weights on the pulley. (See figure 3).
To set the time, slowly move ONLY THE MINUTE HAND counterclockwise (backwards) until the hour and minute hand are at the correct time. (See figure 4).

DO NOT MOVE THE HOUR HAND WHEN SETTING THE TIME.
The hour hand will move automatically when the minute hand is moved. If the clock begins to chime while setting the time, stop moving the hands until chiming is complete. The movement has a self correcting feature which synchronizes the chimes with the time. If after setting the clock on time, it does not chime properly, permit it to operate 2 hours to correct itself.
Clockswithout a pendulum will start automatically if the clock is wound.
To start clockswith a pendulum, reach through the front door of the clock and place your hand on the side of the pendulum disk. Move the pendulum to the far left of center and release. Let the clock operate a few minutes until the pendulum settles into an even swinging motion. (See figure 5).

If your clock gains or loses time after 24 hours, seeGeneral Information Section to regulate the time keeping of your clock.
The product information label identifies the clock model number and serial number. The clock model number and serial number are essential for obtaining parts or service. The product information label is located either on the back or bottom of the clock. Refer to this label when contacting Premier Clocks. For easy reference in the future, take a moment to record these numbers. Attach your sales receipt to this manual for future reference.

Insert the winding key into the holes located in the dial face. (See figure 6).

Depending upon the model of your clock, there can be 1, 2, or 3 winding key holes. Turn the key clockwise until the spring becomes tight and will not turn further. For clocks with hanging weights, raise the weights using the crank. DO NOT lift the weights by hand while cranking. Wind your clock once a week.
Day One
Day Two, Three, Four, Five, Six (If Necessary)
Changing the speed of time keeping is accomplished by moving the pendulum disk up or down. The pendulum disk is moved up or down by turning the adjustment nut. To slow the clock down, move the pendulum disk down by turning the adjustment nut to the left. To speed the clock up, move the pendulum disk up by turning the adjustment nut to the right. (See figure 7). Turn the adjustment nut one complete revolution for each half minute fast or slow per day. (24 hours).

Depending upon your clock model, changing the speed of time keeping is accomplished by moving the time adjustment lever or turning the time adjustment screw located on the back of the clock movement (see figure 8).
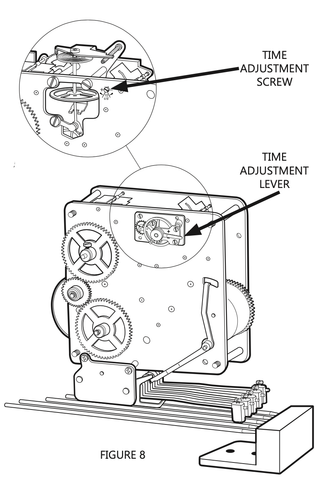
To slow the speed of time keeping (clock runs fast), move the time adjustment lever down towards the “-“ (minus) or turn the time adjustment screw clockwise toward the “-“. To increase the speed of time keeping (clock runs slow), do the opposite by moving the time adjustment lever up or turning the time adjustment screw counterclockwise.
Selecting the chime melody is accomplished by moving a lever on or next to the clock dial. Some models play only the Westminster chime, while others give you a selection of three melodies.
If the dial states “WESTM-SILENT” or “STRIKE-SILENT”, your clock has only the Westminster chime. If your clock has a triple chime movement, the chime lever identifies the melody choices.
Never change the selection while the clock is chiming or positioned near the release points. See figure 9 for when it is safe to move the chime selection lever without damaging the movement.

Your clock requires little care and maintenance. Listed below are steps you can take to maintain the exceptional quality of your Howard Miller clock.
Ensure that all instructions provided with your Howard Miller product have been carefully followed. These instructions will provide detailed information to answer most questions. Contact the Premier Clocks website (www.premierclocks.com) for a list of frequently asked questions that may conveniently resolve your problem or answer your questions.
If the clock chimes more than one minute before or after the proper time, the minute hand should be removed and adjusted.
CAUTION:When performing this operation be careful not to scratch the hand nut, hand or dial.

EXAMPLE:Clock chimes at 1:10 but should chime at 1:15.
If after several hours of operation your clock does not strike the correct hour, grasp the HOUR HAND ONLY and move it forward or backward to line up with the correct hour on the dial indicated by the number of times the hour strikes. Rotating this hand independently will not damage the clock.
If the minute hand needs to be reset (to correct time), move the minute hand counterclockwise (backwards) as described in the “FOR ALL CLOCKS-SETTING TIME” section of these instructions.
DO NOT ADJUST CHIME HAMMERS, unless the chime tone is incorrect. Chime tone may be affected by the hammers resting on the chime rods or striking the rods off center. Although the hammers were set at the factory, it is possible for them to get out of adjustment. For most clocks, it will not be necessary to adjust chime hammers. There are different types of chimes (rods, coils and bells).
Chime hammer arms are made of brass and can be safely bent. If necessary, adjust hammers so that they do not interfere with each other while moving or striking the chime rods, chime coil or chime bell. This is accomplished by bending the hammer arms slightly in the middle so that each hammer rests approximately 1/8” from each rod or 1/8” from the coil or bell. (See figure 11).

DO NOT bend the chime rods or chime coil. Chime volume cannot be adjusted.
Although it is not recommended that you repair your own clock, you should check these items before contacting Howard Miller, your dealer, or an Authorized Service Center. Do not attempt any adjustment you do not feel confident in making.
Comments will be approved before showing up.
